
How to Automate Article Reading Time Calculation on Webflow with a Custom Code Snippet
Sometimes, website users want to know how long it will take to read a complete blog article. This feature can significantly enhance the user experience (UX), and many users will appreciate it. However, Webflow doesn't have a built-in feature to calculate the reading time of a rich text field. Fortunately, achieving this is straightforward if you understand some basic concepts of Webflow and JavaScript. In this article, I will show you how to create a script to calculate reading time quickly and easily.
The Solution
To achieve this, we will divide our solution into two sections: the JavaScript code and the Webflow configuration. Let's start with the JavaScript code.
In this type of article, I will explain how to build the code step by step so you can understand how it works. I'll also provide tips and tricks to improve your coding skills in Webflow.
Building the JavaScript Code
To build the JavaScript code, we need to start with the following basic structure:
<!-- [Start: Automatic reading time] -->
<script>
  (() => {
    // Code here
  })();
</script>
<!-- [End: Automatic reading time] -->
Many people use the Webflow custom code element without fully understanding how it works. This is understandable since Webflow is a no-code tool, making it easy to learn but challenging to grasp what happens behind the scenes.
One thing to always remember is what I call "The Webflow Custom Code Basic Structure." This structure includes:
-
Code Identifier: The name of the code block, usually marked by an HTML comment indicating the start and end of the code block for a specific feature.
-
Code Block: The HTML tag corresponding to the type of code you want to execute. For example:
- JavaScript →
<script> - CSS →
<style>
- JavaScript →
-
Code Encapsulation: This part helps encapsulate the code to avoid conflicts with other code blocks in Webflow.
The main reason I use this structure is that it helps organize, easily identify, and avoid conflicts with other code blocks in Webflow.
First, we need to define the reading speed in words per minute (SPEED) and how we will identify our reading time feature. For this, I will use the following constants and variables:
SPEED: The number of words per minute the user will read. Here, I will use 200 words per minute.attribute: The attribute used to identify our reading time feature. I will use "data-reading-time" as the attribute name.
Next, we need to reference the elements for which we will calculate the reading time. I will use the following references:
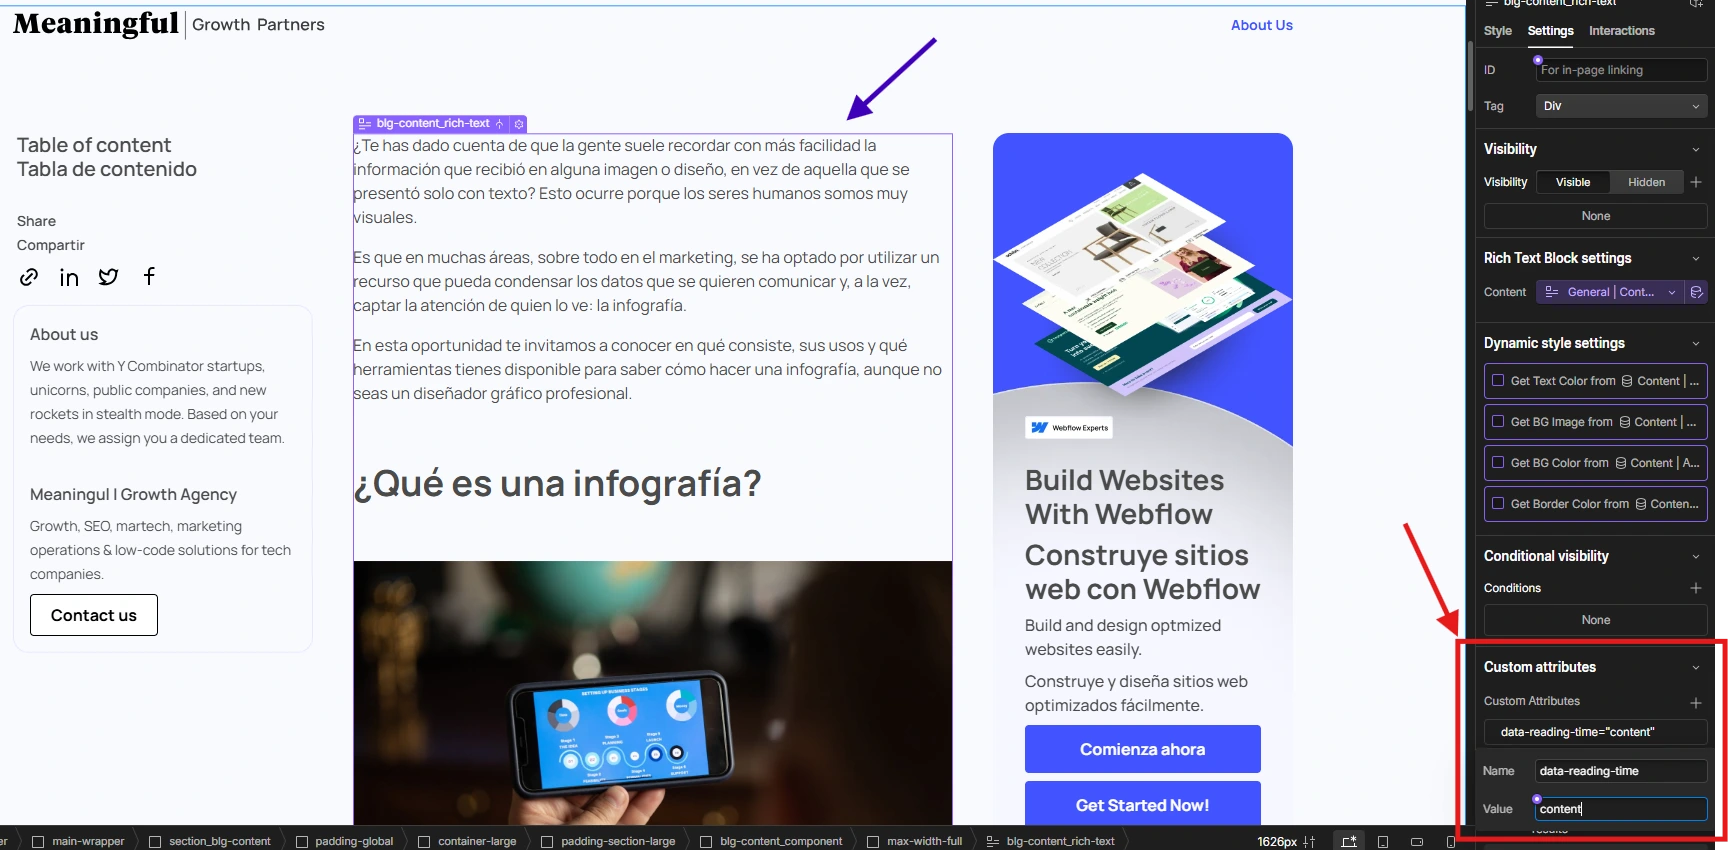
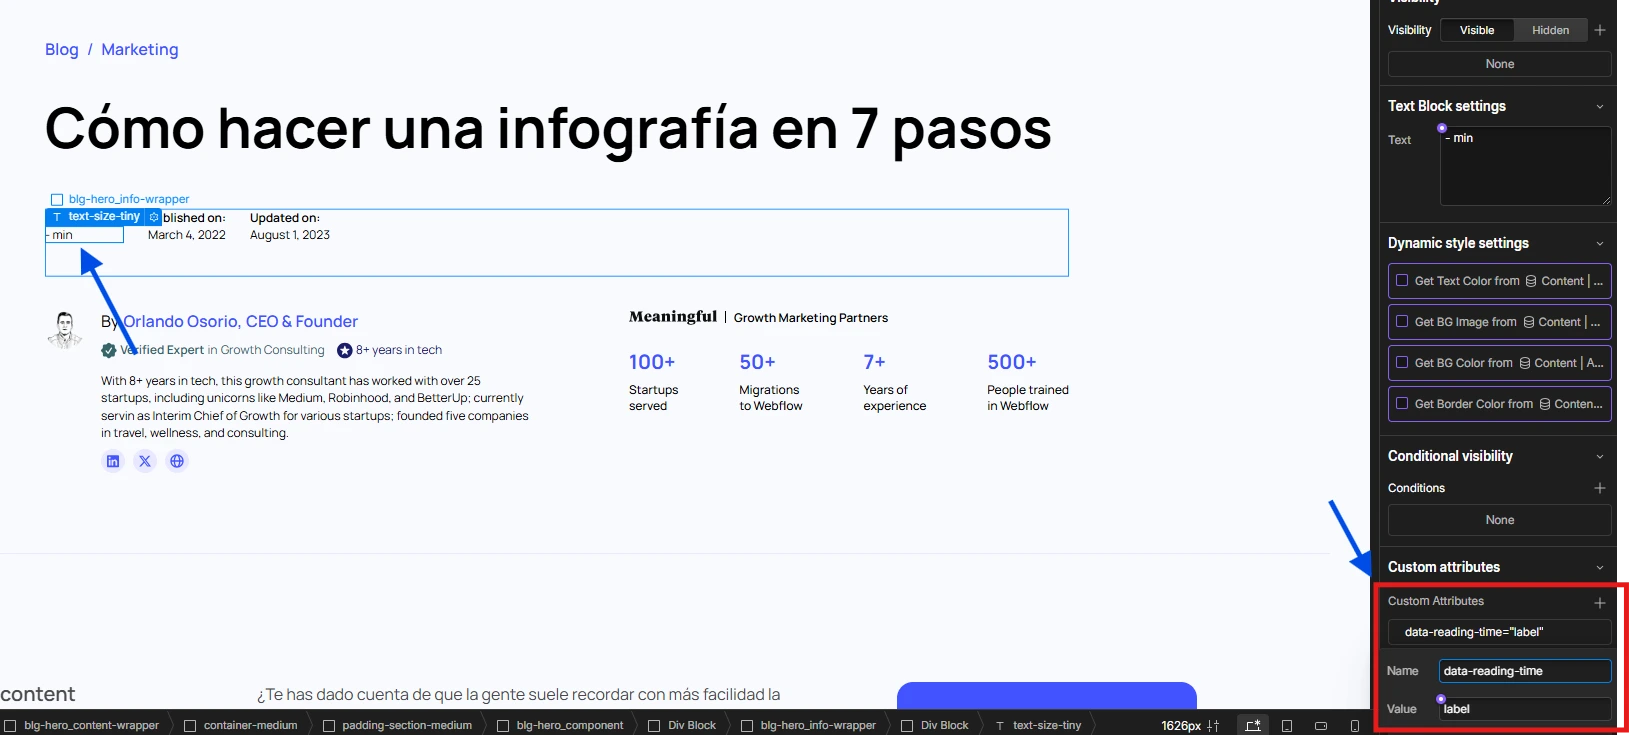
content: The reference to the content for which we need to calculate the reading time.label: The reference to the label where we will display the reading time.
It's common for multiple people to use the same Webflow project, so I like to add a security check to avoid errors when the content or label references are not found. This ensures the code continues executing.
Then, we calculate the reading time. This is straightforward: with the number of words and the user's reading speed, we can determine the reading time in minutes.
Finally, we display the reading time in the label reference using the "innerText" property.
<!-- [Start: Automatic reading time] -->
<script>
  (() => {
    // Constants and variables
    const attribute = "data-reading-time";
    const SPEED = 200;

    // Node references
    const content = document.querySelector(`[${attribute}="content"]`);
    const label = document.querySelector(`[${attribute}="label"]`);

    // Security checks
    if (!content || !label) return;

    // Processing
    const words = content.textContent.split(" ").length;
    const minutes = Math.ceil(words / SPEED);

    // Action
    label.innerText = `${minutes} min read`;
  })();
</script>
<!-- [End: Automatic reading time] -->
At this point, your code should resemble the example above. If it does, we can proceed to the next step.
Webflow Configuration
We are now close to finishing this guide. We just need to configure the Webflow project in three steps:
Add Our Custom Code to the Webflow Page
Navigate to the page settings and scroll down to the "Custom Code" section. Paste the code created in the previous step into the "body" section.
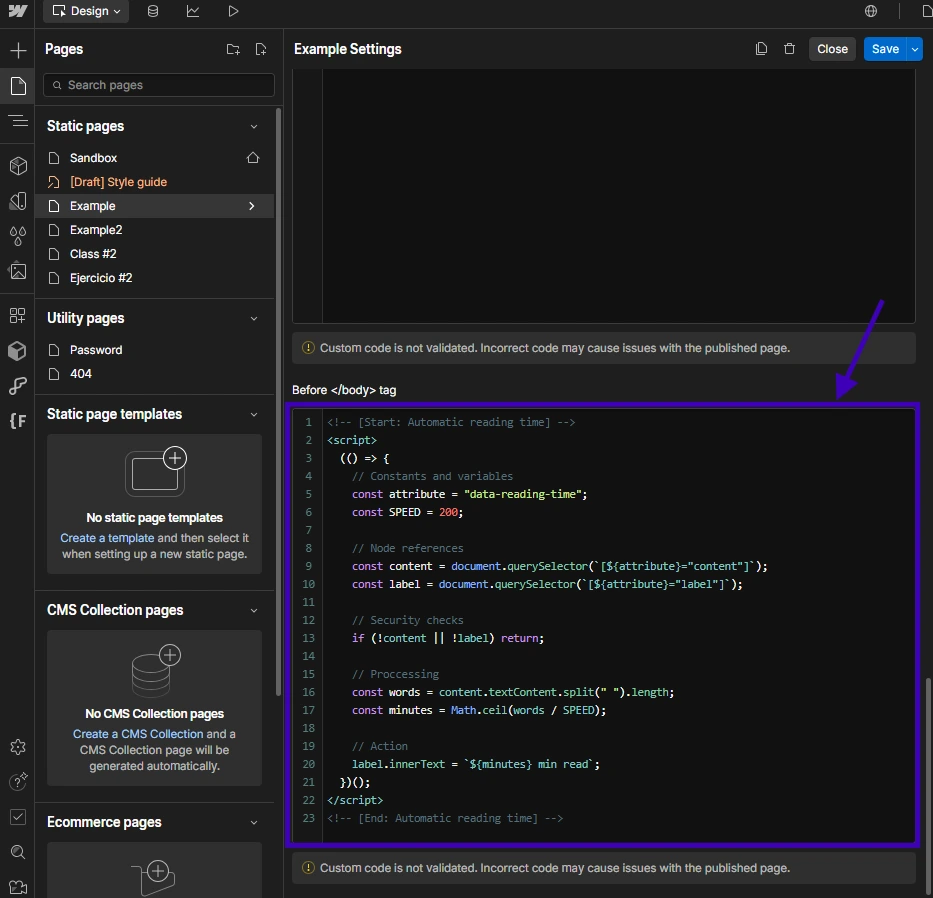
It's important to paste the code in the "body" section because all code placed there will execute once the canvas code is loaded. If pasted in the "head" section, the code won't find the references since the canvas code hasn't loaded yet.
Identify Content and Label References with Attributes
Identify the content and label references with attributes as shown in the following images:
Ensure the attribute name and value are pasted correctly, considering case sensitivity and avoiding spaces before and after the text. For example, " data-reading-time " will not work. The correct format is "data-reading-time" (without spaces).
Publish the Changes and Enjoy the Result
Publish the changes and enjoy the result. After publishing, visit the preview link generated by Webflow to see the outcome.

Remember, custom scripts and codes added in the page settings will only execute on the live page, not in the Webflow designer.
Conclusion
In this article, I demonstrated how to automate article reading time calculation on Webflow using a custom code snippet. While this is a basic implementation, it serves as a good starting point for those looking to learn how to create their own code snippets and enhance their coding skills in Webflow.
I hope you found this guide helpful. If you have any questions, please feel free to ask.